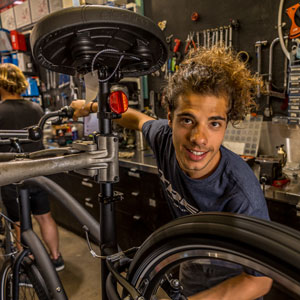
Gold Coast Super Cycle

Call Us Now 07 5524 4758

Address:
91 Minjungbal Dr
Tweed Heads, South NSW, 2486

  • Home
  • Browse Products
    • Bikes
    • Gear
    • Nutrition
    • Sale
  • Service Centre
  • Blog
    • Community/Blog/Events
  • Location
  • Contact Us

Home » The Latest

3 reasons you should replace your bike chain

March 16, 2019 by roger campbell Leave a Comment

Bike-Chain
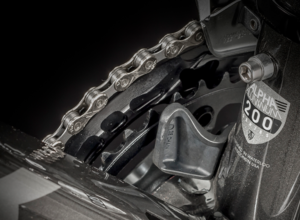
Many people overlook the fact that a bike chain, like brake pads and tyres, are a consumable piece of equipment that needs regular maintenance and replacement over time. Good chain health is crucial to the smooth running of your bike and, when neglected, results in comments like “my gears keep slipping” or “there is a grinding noise when I pedal”. You may notice when you drop your bike off for a service that one of the first things the mechanic will do is check the chain for wear. This is simply because it is the centrepiece of your drivetrain and paramount to a smoothly running bike. So, first up, what is actually going on here?

Tech Zone

Chain-DiagramYour bicycle chain is made up of inner plates, outer plates, pins and rollers. Pins work like axles. They hinge the outer and inner plates together and allow them to rotate.The plates also make contact to the side of the gears when you shift. In between these plates are little donuts of metal called rollers. These rollers rotate around the pins and are the main contact point to your gears. The quality of your chain will have a big effect on durability and shift quality. With that understanding let’s shift things into high gear, here are 3 reasons you should replace your chain.

Your chain has “stretched”

Chain-CheckerNow chains don’t actually stretch, but it is the easiest way to explain the kind of wear a chain will go through. The stretch of a chain can be measured with a “chain checker”. This is a simple devise that measures the movement/play of the rollers. A brand new chain will have about 0.2-0.6mm of play in it. This is necessary for the rollers to rotate freely around the pins. Eventually the rollers’s inner surface wears causing more movement. Once the play is measured at 1mm it is time to replace the chain. If the chain continues to wear beyond this then it will wear down the gears. It’s much cheaper to replace a chain vs replacing chain rings and cassettes. Think of it like changing the oil in your car. It’s a lot cheaper to service it then wait until it blows up and have to buy a new engine.

A new chain will shift better

Along with the bushings, the pins and plates will also loosen over time. This can dramatically affect how well the bike shifts and is the most common reason chains break while riding. Unlike the rollers, this is more subjective to measure. Hold the chain with both hands and move it laterally back and forth. Does it feel tight and stiff? Or is it loose and gritty? If it is the latter then it is time to install a new one even if the rollers aren’t completely worn. Yes you could draw it out a little longer but expect poor shift quality until you replace it.

Damaged link

Broken-Chain-LinkThis may seem obvious at first but hang on, there is more to this. As a rule I always carry a spare joining link (quick link) with me when I ride in case my chain breaks. With a simple multi-tool I can remove the damaged link and replace it with the joining link to get me home. All too often I see riders continue to ride the same chain after replacing the link. Yes sometimes this is ok but consider that by removing a broken link you may have shortened the chain’s length. This can be a big issue if you accidentally shift into the big chain ring up front and the big sized gear (lower gear) in the back. If the chain is too short in this gearing it could rip off your derailleur. A new chain will give you some piece of mind that it shouldn’t happen again soon.

How to make your chain last longer

A clean chain is a happy chain. You don’t have to be pedantic with chain maintenance but you should make an effort. I would recommend cleaning and lubing your chain at least every fortnight. Check out this video we made on how to clean and lube your chain.

Filed Under: Uncategorized

Something for Everyone: Nerang Forest Trail Ride Guide

June 8, 2017 by roger campbell Leave a Comment

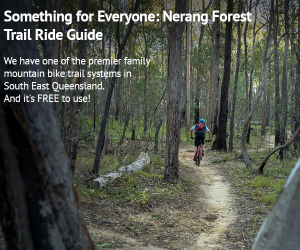
How many times have you woken up on the weekend, looked outside to a beautiful sunny day and asked the family, “What should we do today?” Have no fear because thanks to the hard work of the Gold Coast Mountain Bike Club, Gold Coast City Council, Nerang Trail Care Alliance and countless volunteers we have one of the premier family mountain bike trail systems in South East Queensland. And it’s FREE to use!

We have one of the premier family mountain bike trail systems in South East Queensland. And it’s FREE to use!

Contrary to nearly every mountain bike video ever made, most mountain bikers are local professionals, families or youth looking for some fun, fitness and community. Mountain Biking for me has always been social. Now a father of a 5 year old I am starting to share my love of the sport with my whole family and Nerang is the perfect place for it. Now my little guy might not be ready for the 20 kilometre endurance ride “out back” but there is a velodrome, big grass picnic areas, a road circuit and an easy (Green Rated) loop that any beginner can accomplish with confidence. Did I mention there is new parking and bathroom facilities? So lets get into the meat of the post with a quick guide to the main trails at Nerang.

How Trails are Rated

Now this is a simplified version of the official IMBA Australian trail ratings. But these three levels of difficulty will cover all legal trails within the Nerang Forest. At this point trails may or may not have official signs but this is in future plans. You can use this guide or other official maps that indicate each trail section rating.

Easy/Beginner: Likely to be a combination of fire road or wide single track with a gentle gradient, smooth surface and relatively free of unavoidable obstacles. Short sections may exceed these criteria. Frequent encounters are likely with walkers, runners, horse riders and other cyclists. Beginner/ novice mountain bikers. Basic mountain bike skills required. Suitable for off-road bikes.

Intermediate: Likely to be a single trail with moderate gradients, variable surface and obstacles. Skilled mountain bikers. Suitable for mountain bikes.

Difficult: Likely to be a challenging single trail with steep gradients, variable surface and many obstacles. Experienced mountain bikers with good skills. Suitable for better quality mountain bikes.

With this in mind I’ll start by introducing you to three popular trails all based out of the main entrance at Nerang Forest.

Casuarina Groove Circuit (Easy/Beginner)

Newly renovated, this simple loop is ideal for the first time mountain biker. While a full suspension bike is generally recommended for the best ride, almost any standard mountain bike will do for this trail. You won’t find and drops, jumps or severe technical obstacles on this groove track. The beginning of the track starts at the main gate entrance. The first few hundred meters will take you on a gradual climb with some easy turns and switch backs. You’ll soon come to a split in the trail where another trail meets (Pete’s Track). Take the left track to continue on Casuarina. From here the trail winds through the forest topping out at the optional extra loop. From here you can head straight which will take you back down to the link and then back to where you started. For first timers and youth this would be the best option. For a slightly more adventurous route you can also take a right at the junction towards the 800 meter “Optional Loop”. Officially rated as a Blue trail, you can expect a slightly greater grade and a few small obstacles and quicker switchbacks.

Pete’s Track (Intermediate)

Similar to Casuarina, there has been a substantial reworking of this trail, mainly the upper part over the last season. More technical and a longer more sustained climb, this is the perfect second trail to attempt. It’s an easy to follow out and back allowing you to return down at any point if things get to technical or time is running short. Start at the base of the Casuarina Groove Track but this time take the right turn when the trail forks. You’ll climb for a while eventually crossing the main forest service road. You’ll cross this a few times but the trail continues directly across the road so no chance of getting lost. Pace yourself as the climb stays very consistent almost the entire way up. Once you reach the top you’ll have a few options. If this is your first time attempting this trail I recommend turing right around for a fun and flowing descent. The recent trail work has created smooth berms and added a few fixed obstacles. Please don’t cut corners or attempt to relocate rocks. Enjoy what the trail is and how it flows. There are a few spots where more advanced riders can open up some speed but as this is a high traffic trail keep your eye out for other trail users. Be courteous, keep control of your bike and yield when necessary.

Comm Games Track (Difficult)

Now fully complete and open to the public, the official Commonwealth Games Track is quickly becoming a favourite of advanced riders on the coast. The course consists of three main sections (Loop 1, 2 and 3). Designed for elite cross country racing, these loops will certainly put your skills, vision and fitness to the test. For those not ready for this level of trail it is an easy hike to watch talented riders tackle these sections. Loop 1 is a downhill only section, best know for it’s finishing jumps and berms. A perfect way to end a big day “out back”. To get to the top of this section, climb either the forest service road or three hills connection. Loop 2 connects to Loop 1 and has by far the most technical riding sections in the forest. It is advised that riders dismount and inspect or walk through these sections prior to riding. In most cases you can ride a B line around the most difficult parts. Loop 3 is less technical and has recently been used for local Enduro racing. Be prepared with lots of fitness, skill and vision before attempting these loops. For the advanced rider these loops will put you to the test but leave you with great rewards.

If you are looking for more information regarding these trails, how you can volunteer for the Nerang Trail Care Alliance, join group rides…please contact the Gold Coast Mountain Bike Club (info@gcmtb.com.au) or one of our three Gold Coast Supercycle locations. Have fun and rubber side down.

Filed Under: Uncategorized

How to pick a comfortable bike saddle

February 23, 2017 by roger campbell Leave a Comment

Make no butts about it, being comfortable on your bike saddle is the biggest asset you can have. An uncomfortable saddle takes the joy out of riding and a big reason some people stop riding all together. Attempting to remedy this can be frustrating, just looking at a saddle won’t tell you if it’s going to fit. What if there was some easy way to narrow your options and make finding a comfy saddle easier….well that’s exactly what I’m going to do in this post. So don’t be saddle sore…get saddle sure. Here is how to pick a comfortable saddle.

So don’t be saddle sore…get saddle sure

Focus on posture

Think about how you are sitting on the bike. Are you seated completely upright or do you lean slightly forward? Maybe you ride aggressively or do triathlon. The amount of forward lean will dictate the saddle shape, width and cushion required. Generally the more upright you are the wider and softer you need. The further forward you lean will require a narrower and firmer saddle. The length of time you spend on the bike also can make a difference. Below is a simple zone system to narrow the options.

Saddle-Posture-Chart

Bigger isn’t always better

One common misconception is bigger and softer increases comfort. The size of your butt also has less to do with the saddle selection. Have you had your sit bones measured lately? Seriously, we have a simple way of measuring this at our bike shop. It’s a quick and simple process that requires you to sit on a gel pad and then measure the impressions of your sit bones. For posture 1-4 this is a very useful tool to pick the saddle that gives your sit bones the most support and relieves soft tissue pressure.

Try a pair of padded cycling shorts

I get this question a lot, “how do those roadies ride on those hard saddles all day?” Simple, they wear snug fitted padded shorts. Cycling shorts are silky and tight for a reason. First the slick material decreases friction and wicks moisture quickly. This is a huge help in preventing rubbing discomfort and saddle sores. They are skin tight so that the chamois doesn’t move around and rub the rider’s legs. For those with a more casual riding style, wear these shorts like underwear, yes next to skin always but with some running shorts on top. There are also mountain bike specific shorts that look like hiking shorts but come with a removable padded liner.

30 day comfort guarantee

All of our saddles come with a 30 comfort guarantee. If you’ve gone though the process above then you’ve narrowed your selection down to just one or two options. Give one a try for up to 30 days. If you’re happy with your selection then away you go. If you don’t feel 100% comfortable after 30 days, bring it back to our shop and swap for another option. In the end if it feels good, its a good saddle fit.

Filed Under: Uncategorized Tagged With: bike, comfortable, fit, how to, saddle

8 perfect gifts for the bike rider who already has everything.

November 22, 2016 by roger campbell Leave a Comment

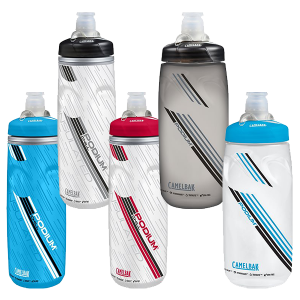
The holidays are coming and you just drew the office cyclist for your secret santa! Now it may seem the easy way out to just get him a fresh set of leg shaving accessories, but lets not get into an intense existential debate of tri-blade vs quad blade effectiveness. So what do you get the bike rider who apparently has everything? Here are 8 perfect gifts for the bike rider who already has everything.

Gift Card to their favourite bike shop

gift-card

Wait it can’t be that easy? Yes it can. Most avid bike riders find themselves back at their favourite bike shop monthly if not weekly. There is always something new they want or most often replacing worn out parts on their ride. Gift cards are a great way to let them choose what they want or need and can be bought in any amount.

Colourful Socks $20/Pair

socksOne of the biggest trends right now is tall bright socks. They don’t even have to match their favourite jersey, just as long as they are bright, loud, funky, pineapples all over them….the more wild you can find the better. Avoid the really short runners socks. Go for mid to tall ones and at around $20 a pair you can get multiples.

Night/Day time running bike lights (Ion 100/Flare R City Set $95)

lightsDaytime running lights are not just for cars and motorbikes. It’s proven time and time again that having lights on your bike during the day gets you noticed and ultimately safer on the road. Not all lights are rated for day time use. They need to have a high powered LED and ultra bright reflectors. Most are rather small and come with USB rechargeable batteries.

Camelbak Water Bottle (Podium $19, Insulated $22)

camelbak-bottleBottles are always getting worn out, dirty, mouldy and lost. Camelbak have created a new style of bottle that no longer spills and drips all over you or your bike. They also come in insulated versions so you can keep a cold drink on your bike in even the hottest summer days. Perfect for mountain bikers too as you can lock off the nozzle when it’s in your backpack so it won’t leak when squeezed.

Scratch Lab Electrolyte Drink Mix (Bag $29, Single $3)

scratch-labsOne of the top drink mixes on the market is easily Scratch Labs. Easy on the stomach, yummy mild flavour, no bad after taste and has little bits of real fruit. They come in a large bulk bag or you can mix up a variety of flavours with a bunch of individual sashays. They also make some tasty little chews to keep your sugar balanced on rides longer than an hour.

Knog Oi Bell (4 Colours $30)

knog-oiIt’s no secret that helmet and bell laws for cyclist are getting enforced more and more. As a result Knog (An Aussie company) has come up with a very simple, pleasant sounding, stealth bell that even fits around road bike cables. You can ring ’em, ding ’em but you don’t see ’em. Choose from four different colours. Easy as ringing a bell.

Quad Lock Phone Mount (Universal Kit $49)

quad-lockWhile some riders swear by owning a Garmin GPS computer, not everyone wants to fork out the premium price for one. You probably already own a good GPS anyways. It’s your smart phone, and there are numerous, most free, cycling apps that will work perfectly as a bike computer. Now you just need a secure way to mount it on your handlebars or head stem. Enter the Quadlock system. If you own one of the recent iPhones then there are custom cases that work perfectly. Already have a good case or use android? Then get the universal bike kit. You’ll peel and stick on the thin connector to the back of your phone or case, zip tie or bungie the mount to your bike and securely click it on. There is nothing I have found to be easier to use or more secure for phone mounting.

New Oakley Sunnies (Radar Lock Prizm Lens $249)

oakleyNow these may not be the cheapest gift in the list but by far they are the most exciting to receive. Sunnies get scratched up a lot from repeated use and eventually will need replacing. Oakley is and has been the gold standard in quality fitness eye wear for decades. One of their most recent innovation is their Prizm line of lenses. They come in two different types, Road Prizm and Trail Prizm. Not only are they top rated for safety but the new Prizm lenses give the rider the best clear vision for off road or on road.

And there you have it! As an avid bike rider and known gear geek I would be thrilled to receive any of these as a gift this holiday season.

Filed Under: Uncategorized

Hardtail or Full Suspension….Which mountain bike is best for you?

October 1, 2016 by roger campbell Leave a Comment


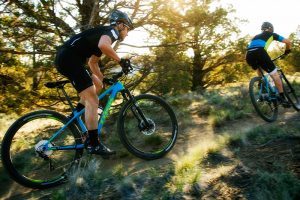
Which is best?: Hardtail or Dual Suspension

trek-full-suspension-mountain-bikeOn the lookout for a mountain bike upgrade or perhaps just starting out and unsure how to spend your hard earned money? The question of whether to settle on a hardtail or go all out into the dual suspension world, although initially daunting, is actually quite simple. Many people are unsure how far they want to go with their mountain biking, which type of bike will do the job and whether they will need to go all out with suspension or not.


It’s all a matter of budget

budget-price-tagThe first consideration when shopping for a mountain bike is to consider your budget as this will certainly determine the type and level of bike you will be in the market for. One of the key benefits of a hardtail is affordability. For an average rider starting out doing some “real” mountain biking we believe the budget starts at $700-$1000, and this is firmly in hardtail territory. Dual suspension bikes at this price are probably best avoided as you will be sacrificing too much in terms of drivetrain and suspension components – basically the bikes aren’t very good! Yet a $800 hardtail will be a great beginners bike – it speeds up the learning process as you become accustomed to choosing the best lines on single track, maintaining momentum, getting out of the saddle climbing, balance to hold wheel traction in technical terrain – basically you learn all the skills and confidence that make mountain biking so enjoyable.

Alternatively if your budget is $2000+ perhaps a dual suspension bike is going to be more enticing and certainly if you can push out to $2500 expect a solid bike capable of handling any trail. Dual suspension is the goto above this budget. The latest technology has resulted in ironing out many of the drawbacks which were once typical of suspension bikes like, for example, pedal induced bob. This means that a decent dual suspension bike has many of the positive qualities of a hardtail with the added benefit of being able to really “open her up” on a fast, rough and technical trail.

Of course there are many excellent hardtails below $1000 which are fine for an average cyclist doing day to day riding, but when it comes to singletrack riding and getting out into the rough and really fun stuff purchasing a performance bike is crucial. It will be more fun, safer and the bike will last the experience!


Simplicity

trek-hardtail-mountain-bikeA key benefit for the hardtail is simplicity. Compared to a dual suspension bike with its extra shock, linkages etc, the hardtail is a simple piece of equipment to setup, ride and maintain. If you like things “old school” neat and simple the hardtail is more a “just get on and ride” type of thing. Dual suspension bikes could potentially spend more time at your local bike shop being serviced and tuned ($$$) and definitely require greater attention when it comes to cleaning and care.

It’s this simplicity that results in a hardtail being a versatile go anywhere bike. Finished with the weekend trail ride? Monday morning you’re riding to work. Sure you could do that on a dually, but one can have TOO much bike sometimes!


Smoothing out the ride

roger-remedyHere we come to the key benefit a dual suspension bike has over a hardtail: the ability to smooth out a rough trail. Comfort is important for many riders, and if this is you, having rear suspension is a no brainer. Apart from the obvious comfort benefits, dual suspension mountain bikes also make it easier to ride tricky single track trails at speed as they soak up the bumps and maintain grip regardless of the terrain. They are also great for building confidence as the bikes are very forgiving of a beginner riders lack of experience.

Contrary to popular belief a dual suspension bike is also a very good climber. Although a hardtail is still the fastest and most efficient climbing mountain bike (in the right hands), dual suspension has the advantage of allowing seated climbing. This is because the rear wheel tracks variations in terrain, affording constant power down. Of course this type of performance comes at the higher levels of suspension quality, but its something to be aware of regardless.


So which is best for you?

Firstly identify what sort of riding you want to do. Are you just mountain biking on rough trails, or is this a do-it-all bike for street riding or commuting as well? Next, work out a budget you’re comfortable with, keeping in mind the type of bike this will steer you toward. Lastly, check out if the bike you have chosen fits with your intended purpose. For example: A 160mm travel “Full Enduro” dual suspension mountain bike is not going to get you to work on the road very well, as much as a $800 hardtail will be next to useless if you plan on competing in the local Enduro meet. So saddle up and head into your local bike shop. If you are cautious about investing into a higher end full suspension ask if a demo bike is available to try before you buy.


Filed Under: Uncategorized

Supertips: How to setup mountain bike suspension.

September 23, 2016 by roger campbell Leave a Comment

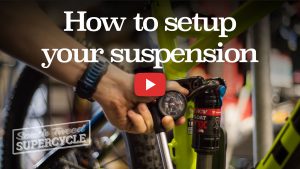
New Supertips video is live. Chuck from our South Tweed location gives you some tips and tricks to setting up your full suspension mountain bike. All you need is your bike and a shock pump to get it done. Watch below.

Filed Under: Uncategorized

There is nothing a 29er+ can’t do! Watch it.

September 16, 2016 by roger campbell Leave a Comment

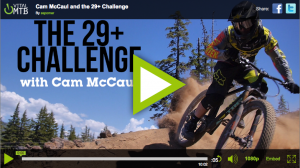
So the 29er+ is starting to make it’s way from the weird and abnormal into main stream trail riding. Lots have been said about the drawbacks of big rubber but turns out there is NOTHING these big wheels can’t do. The limit is only the rider. Watch Pro Trek Factory rider Cam McCaul do just about anything you can imagine on the new Stache 29er+.

Filed Under: Uncategorized

How to adjust your headset video

September 6, 2016 by roger campbell Leave a Comment

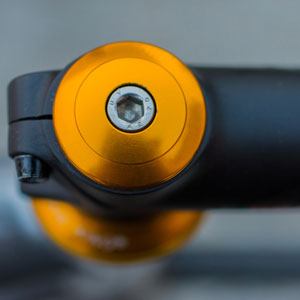
In our latest Super Tips video, Chuck shows you the process for adjusting you bicycle’s headset. You will only need a few simple tools (4mm and 5mm Allen Keys). These can be found in most standard workshops or stop into one of our three Gold Coast locations to pick some up. Enjoy.

Filed Under: Uncategorized Tagged With: headset, how to, video

Commuting by bike is fun….tips and tricks to begin riding your bike to work

August 24, 2016 by roger campbell Leave a Comment

FACT: Driving to work is boring

FACT: Riding a bike is fun

TK15_Ebike_Conduit_SanDiego0431It’s a simple equation really, but one often overlooked. The problem with driving to work, (or anywhere for that matter), is that it’s boring and you generally wish it was over. Then you get to work and you’re down and out before even punching the clock. The mind numbness of sitting in traffic bombarded by commercial radio ads in all their high volume and compressed hysteria…no wonder we’re all depressed and hate our jobs.

“Imagine if there was a better way, a pathway to happiness, energy and aliveness.”

BUT, imagine if there was a better way, a pathway to happiness, energy and aliveness. Imagine starting the day on the front foot instead of the back. It’s all available, and it’s called bicycle commuting.

Yeah okay, perhaps a little dramatic, but I can speak from experience that riding to work is an awesome way to start the day. You get to work feeling more alert, alive and ready to tackle all those challenges, big and small, in a typical day at work. On top of that, it keeps you fit and healthy, and allows you to really enjoy that midmorning chunk of cake.

So what’s involved and what do I need?

BIKE

Zektor-NMahon37Any bike will work, but one with bigger wheels will work better. The larger diameter 700c wheels on a hybrid, flat bar road bike or drop bar road bike roll with little resistance and therefore require less effort to pedal than a fat mountain bike tyre for example. If you are stuck with a mountain bike, try swapping out the knobby tyres for something narrower with a slick “city” tread. This makes a huge difference on the road and actually increases grip.

Hybrids and flat bar road bikes can also be equipped with panniers, racks or other mounted accessories to make carrying work stuff more easily without compromising performance.

To E or not to E?

Electric bikes have come in leaps and bounds recently and are a great option if working up a sweat before donning your office attire is not a practical way to begin the day. You don’t get the same workout as a normal bike, but the thrill of trucking along on an electric bicycle is a joy of its own…and the parking is cheaper.

Clothing

Ride_Guide_J6A1924 (1)Gearing up in skin tight lycra isn’t necessary to ride to work. There are many options. Mountain bike shorts often have a discreet chamois which no one will know about and makes for extremely comfortable riding, but on a short ride you may not even require this. Just make sure your shorts or trousers allow plenty of movement to pedal and aren’t flapping around near the gears and chain.

Cycling tops are breathable, dry quickly and are cut so they don’t blow about while riding. There are lots of casual options if you want to remain more incognito.

Grab a helmet and you’re ready!

Lights

_J6A1845Lights are a legal requirement for riding at night and could mean the difference between getting home safely or not. I don’t mess about in this area and so I bought the brightest lights I could afford and use them religiously. Visibility is everything when riding on the road – contrary to many viewpoints out there, car drivers really don’t want to hurt people, even cyclists! Make it easy for other road users to avoid a bad situation by becoming as noticeable as possible.

“Make it easy for other road users to avoid a bad situation by becoming as noticeable as possible.”

Daytime running lights

My colleague keeps both lights on during his daytime morning ride as well as at night. Again this is a great idea because it helps keep other road users alert to your presence. That bright flicking light in a drivers peripheral vision might mean you don’t end up skipping work because you were in the hospital getting patched up.

Riding in traffic

Bike TrafficAs I’ve already said visibility is everything on the road. None wants an accident, riding so you are well seen by other road users is crucial. When on the road, bike lanes are your friend, but if there aren’t any stay to the left and ride a consistent line – avoid swerving in and out around parked cars – it makes your movements hard to predict. Staying consistent allows drivers to respond to your presence safely.

Sometimes you will have to move into traffic. Make exaggerated hand signals to indicate your intended manoeuvre, check twice, then move into the flow. Remember you are probably a lot slower than the surrounding traffic so friendly wave or gestures to drivers who may be held up is one way to encourage everyone sharing the roads.

“Make exaggerated hand signals to indicate your intended manoeuvre, check twice, then move into the flow.”

Want to know where the best routes are in you area? Stop in to your LOCAL BIKE SHOP and ask some of the employees there. Some or most of them ride to work daily and can give further advice about the best routes and gear to make your morning commute enjoyable.

Filed Under: Uncategorized

Chuck your tubes….tubeless tyre conversion made easy.

July 30, 2016 by roger campbell Leave a Comment

Tubeless-Blog-HeaderI know what your thinking, this is the internet…here’s another guy going off on some opinionated rant about why tubeless is the next mustache. Sorry to disappoint but I’ll leave that to the forums. I’m just going to explain the easiest way you can actually make it work.

Just chuck your tubes in the ute, grab your favourite tyre sealant, yellow tape, some fancy valves and get ready to never run a tube again


The first step is figuring out what combination of rim and tyre you have. Most likely you have one of the following three options:

  1. UST (Universal Standard Tubeless)
  2. Tubeless Compatible
  3. Standard Tyre/Tube Rim

Setting up a UST System

UST LogoBack in the 1990’s, Mavic created the first accepted standardised tubeless system. Tyres and rims that carry the official UST badge go through specific testing, are very reliable and hold the best seal often needing no added sealant. A quick check of your rims and tyres will tell you if this is a feature. If it is then your rims probably came with a special rim tape (some requiring no tape at all) and a UST Presta (French) valve.

Step 1: Install the valve making sure the locking screw and the valve core are tight.

Step 2: Seat both sides of the tyre onto the rim. Work the bead into the middle channel of the rim. Make sure the valve is inside both tyre beads.

Step 3: Use a compressor or pump to get the bead to “POP” onto the rim. Be careful not to exceed the maximum pressure of the tyre.

Step 4: UST tyres/rims don’t always require sealant, but you may choose to add this to heal small punctures while riding. The easiest way to add it at this point is to release all the pressure then remove the valve core. Inject the appropriate amount of sealant, replace the valve core and re-inflate.

SUPER TIP: Use some soapy water to help the tyre fully seat onto the rim.


Setting up a Tubeless Compatible System

TLR_Road_Upgrade_Kit_04A lot of major bicycle brands now spec their bikes with Tubeless Compatible wheels and tyres. The rims often come with preinstalled special rim tape and the appropriate valves. They will usually be set up on the shop floor with tubes but the process to convert is quite simple. Most shops may convert to tubeless for you if you ask during the sale (there may be a small set up cost involved). Tubeless Compatible systems will require sealant. In my experience most sealant brands work but advise purchasing the one your local shop recommends. Most important is always refill (this needs to be done every 4-6 months) with the same stuff.

Step 1: Remove tyre and tube from the wheel and check the rim tape. If the wheels don’t come with special tape already then purchase tubeless conversion tape. This stuff is like thick scotch tape and is usually yellow or orange in colour. I usually do two layers for mountain bike wheels.

Step 2: Poke a small hole at the valve hole and push the tubeless valve in. Tighten the little nut as tight as your fingers will allow.

Step 3: Fully seat one side of the tyre. Start to seat the other side leaving a small bit off the rim to easily pour in the tyre sealant. (You can also fully seat the tyre, remove the valve core and inject the sealant too) Follow the amount recommended on the sealant bottle for your size tyre.

maxresdefaultSUPER TIP: To reduce the chance of sealant spilling, rotate the tyre so the pool of sealant away from the opening before you finish seating the tyre on the rim.


Step 4: Use a compressor or pump to get the bead to “POP” onto the rim. Be careful not to exceed the maximum pressure of the tyre.

Step 5: Spin the wheel repeatedly until you no longer hear any leaking air. Pressure may slightly leak over the first night but the more you spin and ride it the better it’ll stay sealed.

Setting up a tubeless conversion kit on standard wheels

KT0008-Standard-Tubeless_KitBack in 2001 a man by the name of Stan Koziatek created a system for tubeless conversion without the need for UST certified rims/tyres. These days there are a number of companies proclaiming conversion systems for stock and standard mountain bike wheels. While I’m a user and believer that nothing can beat the original, most conversions systems you find in your local bike shop will work effectively. The key to getting it set up proper is selecting the right type of rim strip and using a newer tyre. I’ve seen some very interesting “Ghetto Tubeless” ideas attempted in shops and home garages that can work, but I’ll keep things simple for this article and describe the most common and reliable way to convert.

Step 1: Purchase the correct conversion kit (Stan’s No Tubes, Joes Tubeless…) for your rim width and diameter. Get the one that has the thick rubber rim strip with integrated valve.

Step 2: Tape your rim first with the same tape described in the Tubeless Ready set up. This will ensure an air tight seal at the spoke holes.

TU402Z04Step 3: Install the thick rubber rim strip with integrated valve

Step 4: Fully seat one side of the tyre. Start to seat the other side leaving a small bit off the rim to easily pour in the tyre sealant. (You can also fully seat the tyre, remove the valve core and inject the sealant too) Follow the amount recommended on the sealant bottle for your size tyre.

Step 5: Use a compressor or Pump to get the bead to “POP” onto the rim. Be careful not to exceed the maximum pressure of the tyre.

11881_A_1_Bontrager_TLR_Flash_ChargerSUPER TIP: A great alternative to a compressor is the Bontrager Flash Charger. This type of pump allows you to pre-charge a chamber then release high volume at high speed into the tyre simulating a compressor.


Easy as right? It should be and the best part is you can do it at home without any special tools. Or if you’re strapped for time and want it done professionally, just pop into your local bike shop for a quick set up at an affordable price.

Filed Under: Tubes and Tubeless

Next Page »

Newsletter Signup

Links

  • Home
  • Browse Products
  • Service Centre
  • Blog
  • Location
  • Contact Us

Community

  • News / Blog
  • Facebook
  • Instagram

Contact Details

Store Location

91 Minjungbal Dr
Tweed Heads, South NSW, 2486

07 5524 4758

Copyright © 2019 Gold Coast Super Cycle. All Rights Reserved.

Admin